How I built semi-realistic sample volunteer data for Nonprofit Cloud
Creating sample data for Salesforce using Snowfakery, CumulusCI, and ChatGPT (or the LLM of your choice)
Realistic volunteer data makes learning Nonprofit Cloud so much easier, but generating that data from scratch can be painfully time-consuming. I ended up using a process that uses Snowfakery, SQL, and ChatGPT together to make the process faster, easier, much more fun, and done in an afternoon.
I recently put together a volunteer sample dataset for my NPC scratch org project, and wanted to share what worked. This will be easier if you’re already familiar with Snowfakery or CumulusCI, but each step is possible even if you’re not a command line power user. (If you’re intrigued by this but aren’t quite comfortable going it alone, please reach out!)
Quick tool primer
If you haven’t used these tools before, here’s what you need to know:
Snowfakery is a free, open-source tool for generating fake data. You write a “recipe” that describes what kind of records you want (Accounts, Contacts, custom objects) and how they relate to each other, and Snowfakery produces as many realistic-looking records as you need. It’s especially good at creating connected data — like a Volunteer Initiative that has multiple Job Positions, each with their own shifts.
CumulusCI (CCI) is a command-line tool built by Salesforce.org for managing Salesforce development projects. Among many other things, it can push data into a Salesforce org, extract data from an org into a SQL file you can edit outside Salesforce, and load that data back into different orgs.
Together, these tools let you define a data structure once and reuse it across as many orgs as you need — no manual data entry, no CSV gymnastics.
Here’s the high-level idea:
-
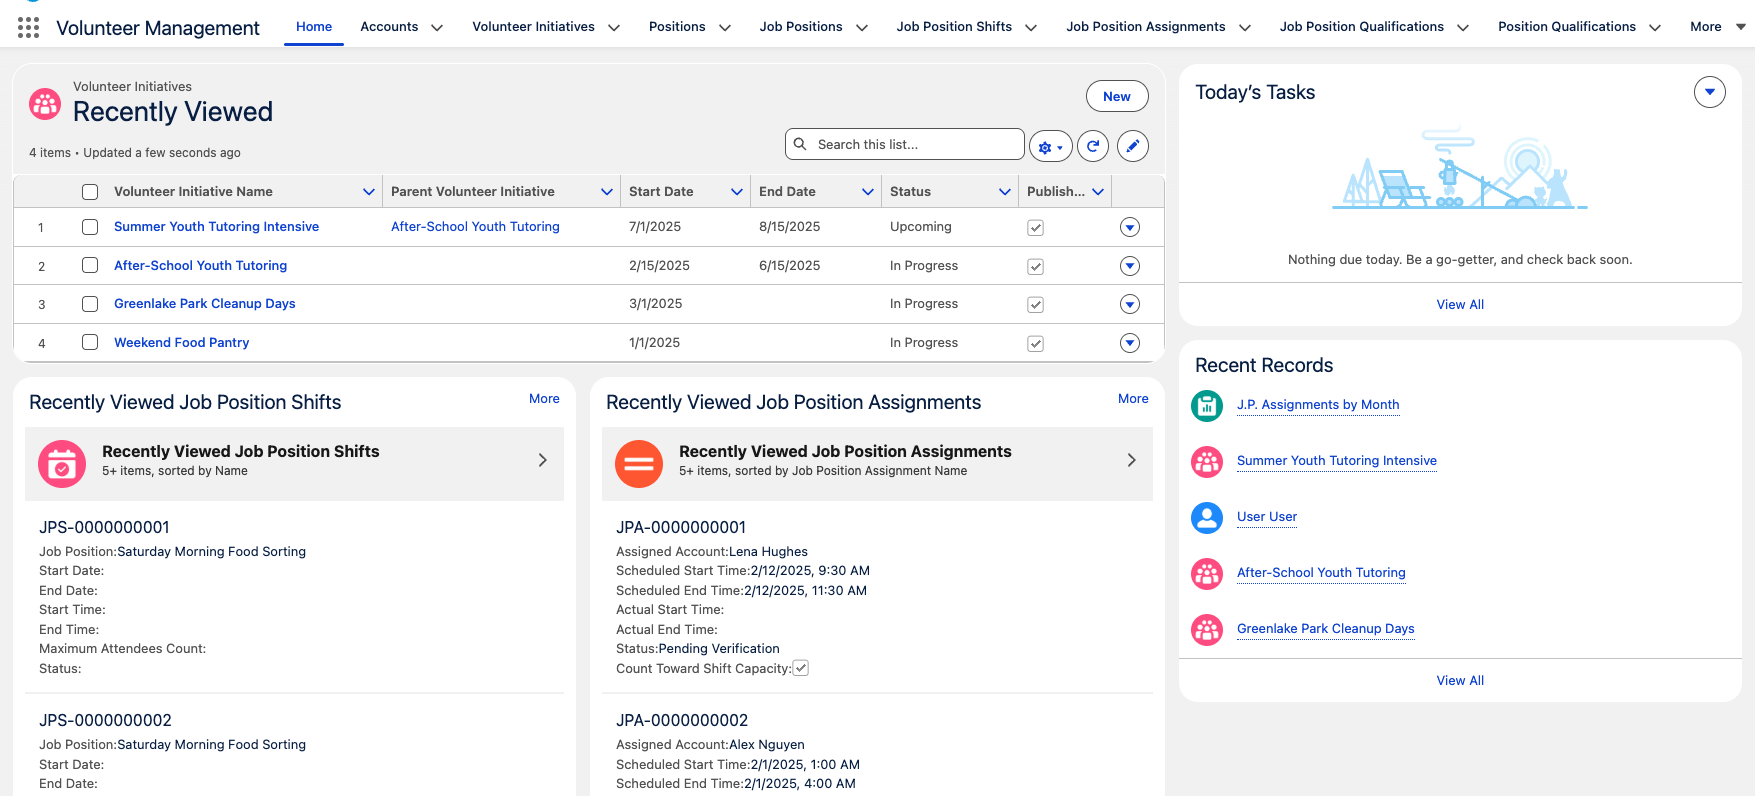
Create a Snowfakery recipe to generate the structure of the data. Snowfakery is perfect for building all the relationships: Volunteer Initiatives -> Job Positions -> Job Position Shifts -> Job Position Assignments. You don’t have to make the values pretty yet — just get the structure right.
-
Populate an org with your generated data. Run your Snowfakery recipe to create sample records in a scratch org. The data will look boring at this stage, but all the relationships will be correct.
-
Generate a CumulusCI data mapping based on your populated org. This mapping file describes how to extract and load your data structure, capturing which objects, fields, and lookups matter.
-
Extract the data from Salesforce into SQL. CumulusCI turns your org’s data into clean SQL tables that you can review and modify without touching Salesforce.
-
Transform the SQL to make it feel real. This is where ChatGPT shines. Feed it one SQL table at a time and ask it to replace placeholder values with plausible names, dates, times, and descriptions – while keeping all foreign-key relationships intact.
-
Load the cleaned data back into another Salesforce org. Once the SQL looks good, CCI loads it straight into a scratch org with all relationships preserved. You can reuse this dataset again and again.
Below is what this process looks like in practice.
Step 1: Start with a minimal Snowfakery recipe
The goal at this stage isn’t to produce perfect data—it’s to produce a correct minimal data structure with connections between related objects.
I started with this prompt:
I want to create a sample dataset for people and volunteers to demonstrate
the volunteer management functionality of NPC. Can you write me a Snowfakery
recipe to create the relevant records? Keep in mind that we're using Person
Accounts, not NPSP's household account model, so not every contact will need
an organizational account.

Here's the default recipe for reference:

- object: Account
  nickname: nonprofit_account
  count: 5
  fields:
    Name:
      fake: company
    Type: "Organization"
    BillingStreet:
      fake: street_address
    BillingCity:
      fake: city
    BillingState:
      fake: state
    BillingCountry: "United States"
    BillingPostalCode:
      fake: postcode
    Phone:
      fake: phone_number
    Description:
      fake: catch_phrase
That gave me a Snowfakery recipe covering Account, VolunteerInitiative__c, JobPosition__c, JobPositionShift__c, and JobPositionAssignment__c. Then I iterated to add more of the model based on the docs.
I used ChatGPT to build out the rest of the recipe, but there was a fair amount of back-and-forth to get things working right. The number of validation rules embedded in NPC make using generated data particularly challenging, but every time I hit a road block I just pasted the error into my conversation to get suggestions on resolution. Sometimes the initial suggestions worked, sometimes I had to ask for something different. Here’s the text of the conversation.
You want to end up with a recipe that covers all objects you’re interested in and their relationships, but it’s not critical that we fill in all fields yet.

A Snowfakery recipe let’s you define which objects and fields you want to populate, and includes what types of fake data make the most sense for each field.
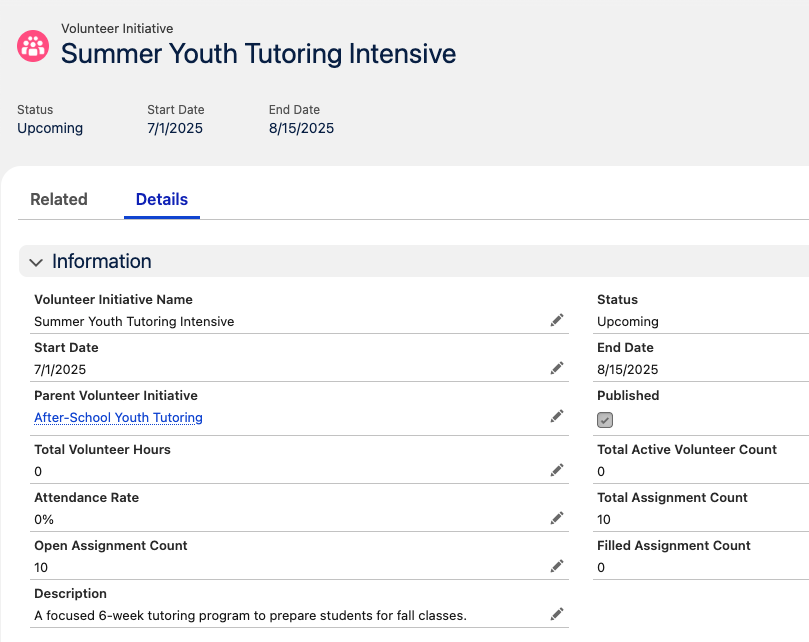
Step 2: Generate data in your Salesforce org
Once you’ve got your recipe ready to test, you can run the snowfakery task in cci to populate an org with fake data. (This should be a “throwaway” org just for this purpose.) I did this every time I made significant changes to my recipe (like on each new object) to make troubleshooting simpler.
cci task run snowfakery --recipe datasets/volunteer_recipe.yml --drop_missing_schema True --org myorg
This recipe makes sure we have correct relationships between all objects, so we start from a reliable scaffolding instead of trying to hand-craft CSVs.
So now you have data in your org, but it doesn’t look that convincing. Next we’ll generate a data mapping file to help us extract that data so we can modify it.
Step 3: Generate a CumulusCI data mapping based on populated data
Now that your recipe has all the objects you want in it (with relationships to other objects) and you’ve populated an org with that data, you can use cci to create a data mapping based on the data in the org. This mapping will let you extract and load specific data using cci.
This command will generate the mapping that we’ll use to pull and modify the generated data:
cci task run generate_dataset_mapping --path datasets/volunteer_mapping.yml --org myorg
You get a yaml file that describes the data shape you’re going to import with CumulusCI.
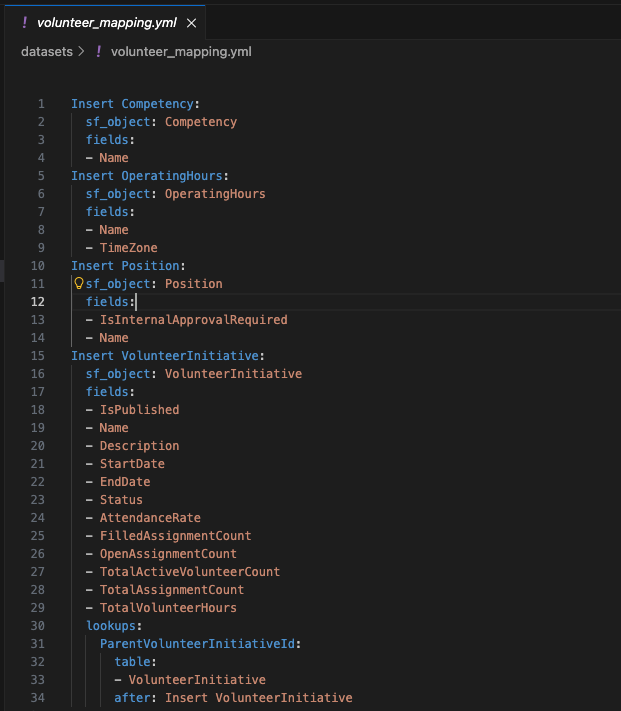
A CumulusCI data mapping file is similar to a Snowfakery recipe, but doesn’t include anything about generating fake data.
You’ll want to take a look at the data mapping to make sure it picked up everything you wanted to capture (and nothing you didn’t want to capture). You can specify which objects you want to include the mapping as an option on the command:
cci task run generate_dataset_mapping --path datasets/volunteer_mapping.yml --include "Account, Contact, VolunteerInitiative, JobPosition, JobPositionShift"
(The full list would be much longer.)
- ChatGPT can help with command syntax, but always verify against the official CumulusCI task reference for accuracy.
We’re getting close to the fun part …
Step 4: Extract the data from Salesforce into SQL
It’s time to pull our data from Salesforce into a SQL text file so we can manipulate it.
We’ll use the mapping file we just created to pull just the data we want:
cci task run extract_dataset --mapping datasets/volunteer_mapping.yml --sql_path datasets/sample-volunteerdata.sql --org myorg
Step 5: Transform the SQL to make it feel real
This was the part that surprised me most: SQL is actually an extremely easy format for ChatGPT to work with.
I followed this pattern:
-
Take one SQL table at a time, e.g.:
INSERT INTO job_position (id, name, description, volunteer_initiative) VALUES (1, 'Position 001', 'Placeholder description', 3), (2, 'Position 002', 'Placeholder description', 1); -
Tell ChatGPT:
“Please replace these placeholder values with realistic nonprofit volunteer job positions. Keep all ID values and foreign keys unchanged.”
-
ChatGPT replies with:
INSERT INTO job_position (id, name, description, volunteer_initiative) VALUES (1, 'Food Pantry Intake Assistant', 'Greet visitors, gather basic information, and direct them to the appropriate services.', 3), (2, 'Event Set-Up Volunteer', 'Assist with setting up tables, chairs, signage, and materials before community events.', 1); -
Copy and paste the resulting section into your sql file over the corresponding section with fake data.
-
Repeat for each table - Positions, Shifts, Assignments, People.
This allowed me to fine-tune tiny details (shift durations, role descriptions, notes, skill levels) without breaking referential integrity.
You can also ask ChatGPT for realism constraints:
-
no overlapping shifts
-
consistent opening hours
-
more diversity in names
-
volunteers tagged with relevant competencies
-
person availability that lines up with shifts
If ChatGPT broke something (happens!), I pasted the error back in and asked it to fix the issue.
Step 6: Load it into a new Salesforce org
Once the SQL is cleaned up:
-
Make sure your SQL file is saved.
-
Leave the Snowfakery-produced
dataset_mapping.ymlexactly as generated. -
Run:
cci task run load_dataset --mapping datasets/volunteer_mapping.yml --sql_path datasets/volunteer_storydata.sql --org myvolunteerdemoorg
And magically, you’ll have real looking volunteer data!
Why this works
✔ No CSV headaches
SQL keeps relationships intact automatically without the need for custom External ID fields.
✔ No fighting with Snowfakery for realism
Let Snowfakery handle structure. Let ChatGPT handle flavor.
✔ You don’t have to be a CLI wizard
You can edit SQL in any text editor, or even spreadsheet-style tools.
✔ It’s reusable
You can build multiple nonprofit domains — grantmaking, fundraising, programs — using the exact same workflow.
✔ Same dataset, infinite orgs
Once you have cleaned SQL + mapping, you can load this exact dataset into any scratch org or sandbox repeatedly—perfect for demos, training, or testing.
✔ It’s shareable
Push your recipe, mapping, and SQL to GitHub and your whole team can use the same sample data. Perfect for onboarding, training, or collaborative exploration. (Just remember: synthetic data only—never commit real client information!)
Where This Can Go Next
This workflow — Snowfakery for structure, SQL for visibility, and ChatGPT for realism—gets you to a solid, reusable baseline. But the real power shows up once you start layering in specific nonprofit scenarios.
Imagine different datasets tailored for:
- a food pantry with multiple weekly shifts
- a museum with docent scheduling and training requirements
- a marathon event with dozens of volunteer roles
- a hospital auxiliary with credentialed assignments
- a seasonal program with fluctuating capacity
You can generate those scenarios by feeding prompts directly into an LLM, by tweaking the SQL yourself, or by working directly in an org with the generated dataset loaded and retrieving the modified data from your org back into SQL — whatever feels most natural. Either way, the foundation makes it easy to iterate.
I’d love to keep refining these datasets. If you have a scenario you’d like represented — or want to help shape future versions — send ideas my way. The more real-world programs we model, the more useful this can be for everyone exploring Nonprofit Cloud.